Opening of GPX files with applications on Android
With the development of technology and the widespread distribution of smartphones with built-in GPS devices, the GPX files and the like them (KML and KMZ) became very useful as a means of sharing experiences between tourists, mountaineers, cyclists, etc. That is because now everyone can record its own “walk” and share it with others interested via the Internet.
The GPX file is a systematised collection with coordinates of multiple points, connected by a broken line with direction. When it is placed on an electronic map, the line depicts a tourist route. In addition to the location of the course on the map, time and speed for transition can also see a longitudinal section of the road. That gives a real idea of the terrain along the way, where and how long the ascent, descent, etc.
We will take a look at two of the many applications running on Android that serve to open GPX files for the needs of tourists.
I) Opening a GPX file with “Gpx viewer”
The “Gpx viewer” is an easy-to-use application suitable for persons with a fast-paced lifestyle who doesn’t want to waste time on additional and complicated at first glance settings. Allows you to quickly and easily open a GPX file and see the route on the map as well as your location relative to it. You can only follow the loaded track but not record your walking. It only works with Google Maps online, which in some cases is a disadvantage.
If you have pre-loaded the route in an area where you have Internet access, the section of the map, where is the track, will be stored in the data cache. That will still allow you to see part of the plan even if you are in an area without access to mobile data, but you have to remember that you should not erase the data cache. In case, by any chance, that happens, you will still be able to see the GPX file as a broken line to follow, though you do not have a map as a bottom layer.
To open a GPX file with “Gpx viewer”, follow these steps:
1. Download and install “Gpx viewer” on your smartphone from Google play
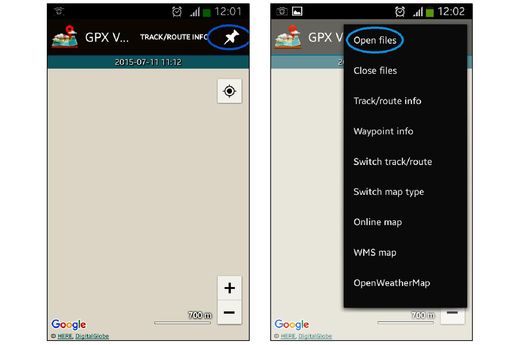
2. Select the pin-like symbol
3. From the popup menu, select the “open files” option
4. Int this way you have made this option leading, and it will appear in the top bar to the left of the pin
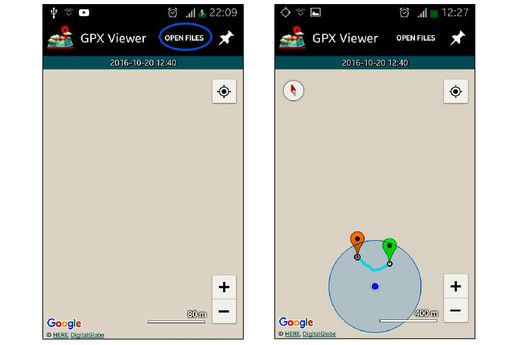
5. When selecting “open files” again from the top bar, you will find yourself in a directory menu and the option to select a GPX file. You must choose the data that you have downloaded in advance, and you intend to follow
6. After selecting the track, you will see it in blue colour on the map and your location as a blue dot relatively to it.
II) Navigation with Oruxmaps

A useful application that has many options – you can record your walking (not only as GPX but also other files) and do not need a permanent Internet connection, as it can work with offline maps. The significant advantage of Oruxmaps versus other applications is the ability to open any maps developed for GARMIN in “IMG” format, which may even be generated by hikers. Some sites also offer scanned old paper maps, designed and positioned so that this application can successfully use them.
For Bulgaria, an excellent electronic map, developed especially for mountaineers and tourists, which has many eco trails with topographic data and is completely free of charge, is the “BGMountains” map.
To set Oruxmaps so to uses BGmountains as a bottom layer, and then to place GPX tracks above, follow these steps:
Note: The description provided here is valid until version 6.5.10. In version 7.4.22, the menu has minor changes to the GPX file load button – see below for more information.
- Download and install the free Oruxmaps app on your smartphone from the official app site. It may sometimes be impossible to download it with the Google Chrome browser. In such cases, you can easily download it with Mozilla Firefox or another browser.
- Download from this link the “BGMountains” map on your desktop computer – the basic Latin version or the light Latin version for direct upload into the receiver as an IMG file. Usually, the map is downloaded as a zip file. Have to extract it to produce an IMG file. After, upload it to your smartphone.
- Create a folder in the SD card of your smartphone, which we will conditionally call MAPS. You can also name it another way. The map files are large and thus will not trouble the main memory of your phone where the leading applications are stored.
- Connect your phone with a cable and save the downloaded and unzipped card (as an IMG file) to your phone’s MAPS folder.
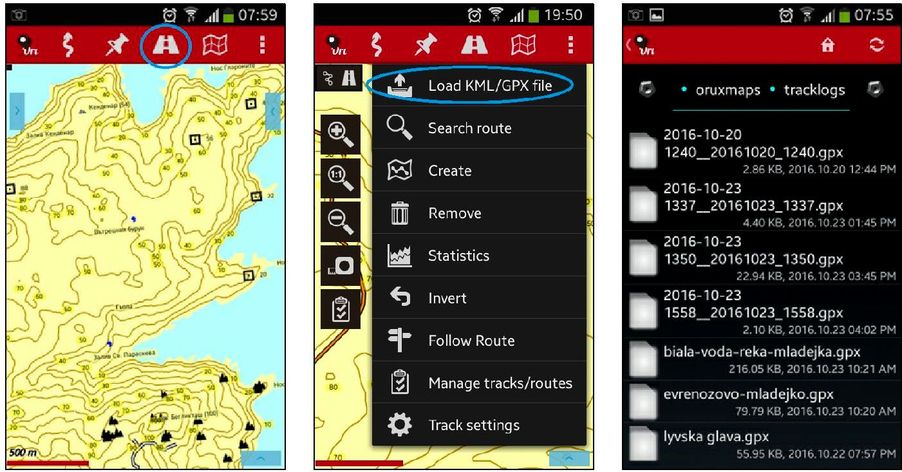
5. The application must be configured to obtain the map files from the MAPS folder. To do this, press the three dots symbol at the right end of the display and select Global Settings. From the following menu, select Maps and then the Maps directory.
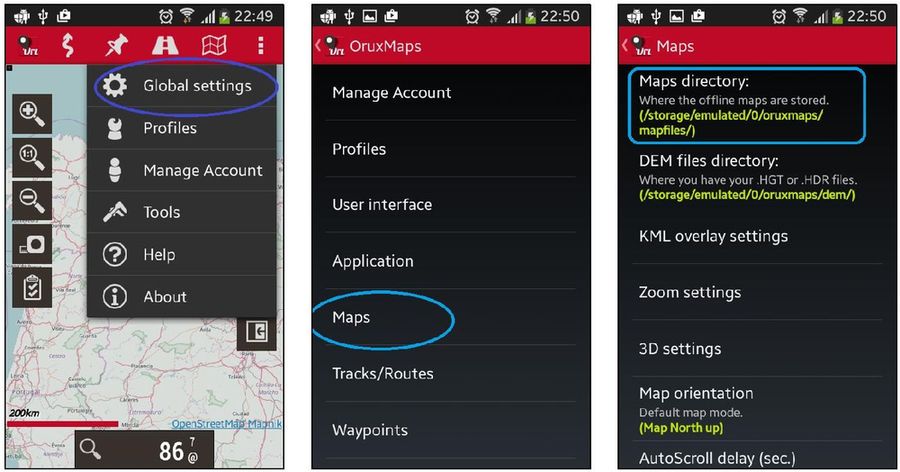
Initially, the folder to which the application is directed to obtain map files is “mapfiles” under Oruxmaps. Selecting the left symbol will go up in the directory hierarchy until you have the option to choose the SD memory card (Extsd). Once in the SD card, select the MAPS folder (or where you saved the map).
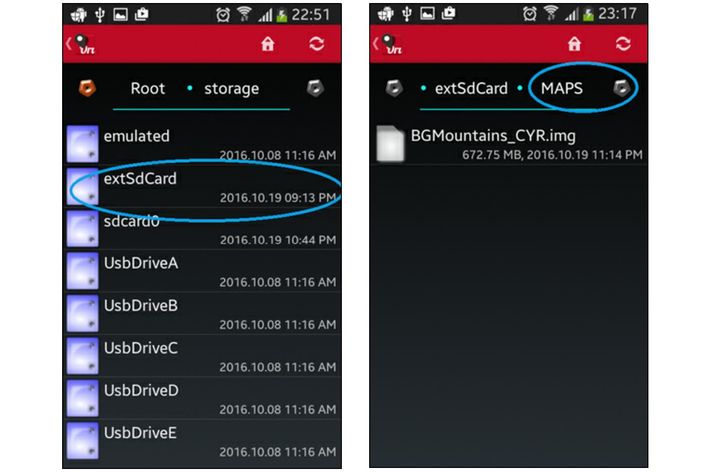
When you see the files stored inside, select the directory name (in the case of MAPS in the upper right). In this way, you have already made it a leading directory. Further, Oruxmaps will now choose the maps you want to work with from here.
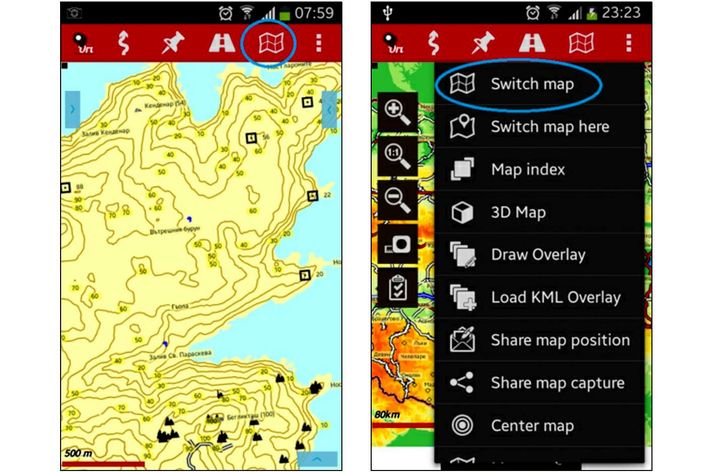
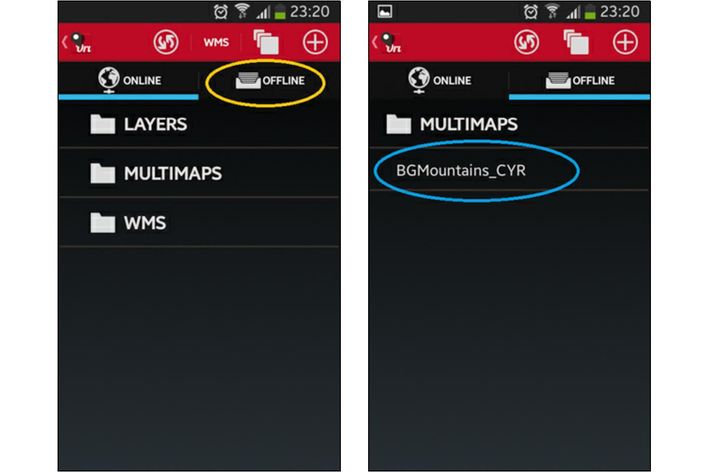
6. Select from the button resembling a map, “Switch map” option and then “Offline” mode. If it still does not show the “BGmountains” map file as a choice, then restart Oruxmaps or press the refresh button. Repeat the same – “Switch map” – “Offline” mode -, and after the file “BGmountains” has been already visible, you select it.
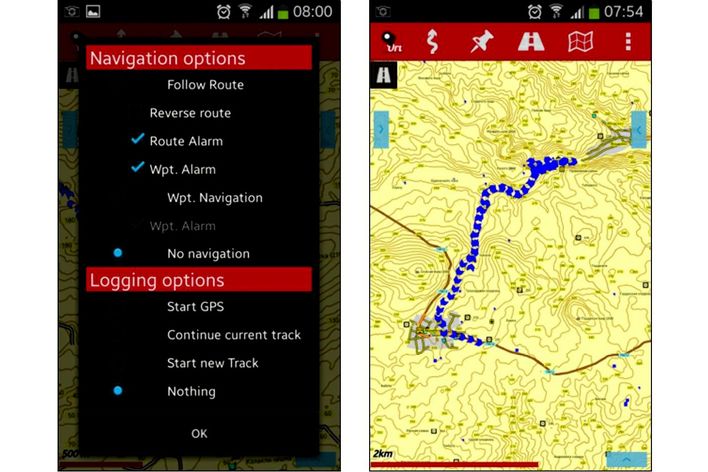
7. To open a GPX file, you need to select the symbol resembling a road. After choosing the option “Load KML / GPX file”, it will be opened the default “tracklogs” folder. The Oruxmaps application uses it to store tracks. You must have previously saved a trail (GPX file) that you intend to follow. When you select it, a window will open that offers various options for tracking the route. Those are alarm and the ability to record your walking in another file). Whichever option you choose, you will finally see the track (GPX file) placed on the map, in bold blue, as well as your location as a point.